Let us create a todo app with React, Hasura and GraphQL!

Overview
What exactly is Hasura and what makes it very different?
Hasura is a very fast Graphql server that gives you an instant and real-time GraphQL APIs. Basically, the aim is to make application development easy. Traditionally, before a frontend app can be created, backend APIs have to be created first which makes the process kind of two-dimensional or more and longer, but Hasura solves it in a one-dimensional way whereby Apis can be created alongside rendering the UI and data can be stored in one environment coupled with the ease of using GraphQl for its API architecture flexibility.
Understanding Core GraphQl Concepts that will be used during the course of this tutorial:
The Schema Definition Language (SDL):
This concept is used to define the schema of an API; for example - a simple type Person
type Person {
  name: String!
  age: Int!
}
A fixed endpoint:
GraphQl uses a fixed endpoint unlike how the Rest API architecture is structured in a way that a specific set of information is meant to be returned from a/some specific endpoint(s). The structure of the data that is returned from a GraphQl API is not fixed. It is flexible and the client can decide exactly what data is needed.
Queries:
an example is:
type Query {
  notes {
    title
  }
}
notesrepresent the root of a query while thetitlerepresent a query's payload. Most times, the root of the query represents a db table.queryallows a client to fetch data in a request.
Mutations:
an example is:
type Mutation {
  notes(title: String!)
}
mutationmodifies the data in the data store and returns a value.- In the code above, it takes in an argument
titlerecognized as a string.
Let us get started:
Technologies
The technologies that will be used in creating this app are:
- Node.js (make sure this is installed)
- ReactJs
- Hasura
- Postgres
Create GraphQl endpoint
Firstly, since we are using the Hasura Graphql Engine, we have to create a graphql endpoint through Hasura cloud. Head off to https://hasura.io/ to create an account, if you don't have one.
Create a new project and click on Try with Heroku(which means that your database will sit on Heroku). After that, your graphql playground is all set up! Click on launch console to view it.
Copy the graphql url as we will be using it during the course of this tutorial.
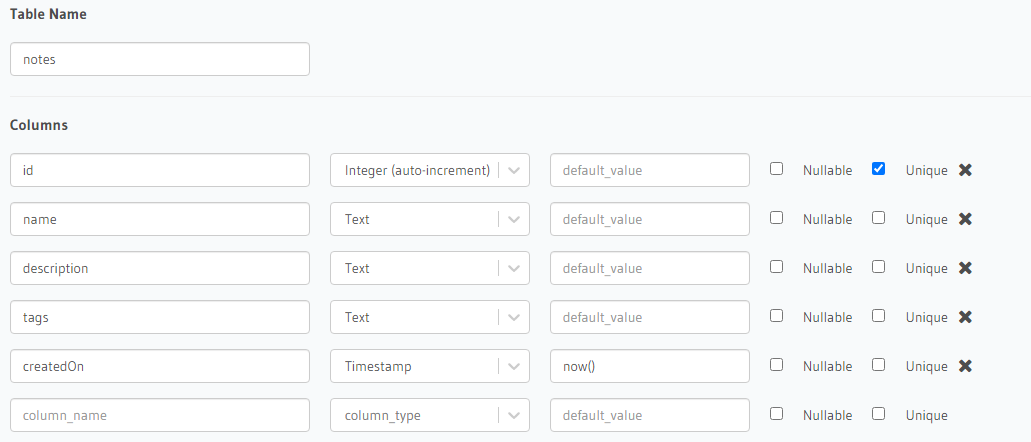
Create your schema like below:
In the data panel:
Step 1:
Some tools/libraries need to be installed
npx create-react-app todo-app- to quickly create a new react app into a folder calledtodo-appand save you from a time-consuming setup and configuration process.npm install react-router-dom -S- a tool that allows you to handle routing in your react application.npm install @apollo/client -S- a state management library that allows you manage both local and remote data with graphql.npm install graphql -S- a tool that allows you build a graphql schema and serve queries against that schema.npm install react-icons --save-dev- a tool that allows you to import and make use of free icons.npm install toasted notes react spring --save-dev- a tool for rendering alerts and messages.
Once the react application has been created, it automatically installs the basic tools needed to start a new react app. You can check it by using: npm run start
Step 2:
Creating basic folders
In the src folder, create new folders called: components and queries .
Also, in the already created components folder, create other folders called: add-notes, get-notes, get-single-note, update-note
Step 3:
Set up apollo client in the react app
In the App.js file, delete the contents in it and add:
import React from "react";
import {
  ApolloProvider,
  ApolloClient,
  InMemoryCache,
} from "@apollo/client";

const client = new ApolloClient({
  cache: new InMemoryCache(),
  uri: "https://casual-egret-35.hasura.app/v1/graphql", // you can use your own `uri` if you like!
});

function App() {
  return (
        <ApolloProvider client={client}>
        </ApolloProvider>
  );
}

export default App;
Note:
ApolloClient,InMemoryCacheandApolloProviderare imported from the Apollo client library.- A new Apollo client contructor is configured and the GraphQL server's URL is added as a property.
InMemoryCachewas also added as a property to cache queries. As seen from the docs: enables the client to respond to future queries for the same data without sending unnecessary network requests.- The component(s) routes will be wrapped in
ApolloProviderwhich enables you to access the client from anywhere.
Step 4:
Creating the components
In the queries folder, create a file called index.js and add the following code:
A query to add a note
import { gql } from "@apollo/client";

export const insertNoteMutation = gql`
  mutation ($name: String!, $description: String!, $tag: String!,) {
    insert_notes(objects: {description: $description, name: $name, tag: $tag}) {
      returning {
        id
        name,
        tag,
        description
      }
    }
  }
`;
Note:
gqlis imported from the apollo client used in parsing a string into a document.- The
insertNoteMutationis a function created to create/modify the data in the database and return some values using the graphqlmutation queryand the prefixinsertfor the tablenotes.
In the add-notes folder, create a file called addNote.jsx and add the following code:
import React, { useState } from "react";
import { useMutation } from "@apollo/client";
import { Link, useHistory } from 'react-router-dom';
import { insertNoteMutation } from "../../queries";
import "./addNote.css";
import toast from "toasted-notes";
import "toasted-notes/src/styles.css";

export default function CreateNote() {
    const [insertNote] = useMutation(insertNoteMutation);
    const [loading, setLoading] = useState(false);
    const [name, setName] = useState("");
    const [description, setDescription] = useState("");
    const [tag, setTags] = useState("");

    let history = useHistory();

    const handleSubmit = async (event) => {
        try {
            event.preventDefault();
            setLoading(true);
            await insertNote({
                variables: { name, description, tag }
            });
            history.push("/notes");
            if (true) toast.notify("Successful")
        } catch (error) {
            setLoading(false);
            if (error) toast.notify("Something went wrong. Please try again later.")
        }
    }

    if (loading) return <p className="load">Loading ...</p>;

    return (
        <>
            <p className="title">A Simple Notes todo app created with<br /> ReactJs, Hasura, Graphql and Postgres</p>
            <div className="container">
                <p className="little-title">Add a Note </p>
                <form onSubmit={handleSubmit} align="center">
                    <input
                        type="text"
                        value={name}
                        placeholder="Add a name"
                        onChange={e => setName(e.target.value)}
                        required
                    />
                    <textarea
                        type="text"
                        value={description}
                        placeholder="Add a description"
                        onChange={e => setDescription(e.target.value)}
                        required
                    />
                    <input
                        type="text"
                        value={tag}
                        placeholder="Add a tag"
                        onChange={e => setTags(e.target.value)}
                        required
                    />
                    <br />
                    <input type="submit" value="create" className="button" />
                    <Link to={{
                        pathname: `/notes`
                    }}>
                        {" "}
                        <input type="submit" value="all notes" className="button" />
                    </Link>
                </form>
            </div>
        </>
    );
};
Note:
- The above is a functional component making use of react hooks and apollo client hooks. quick-note: hooks allow us to define states without writing a class.
- Some required libraries are imported.
- The declaration of all the state variables.
- A function called
handleSubmitis created to destructure objects(variables) from theinsertNotestate, remember that theinsertNotestate was already assigned to the imported functioninsertNoteMutation. react toast notifyis used in both handling successful and error messages,- Finally, in order to render the results, a
returnfunction is declared by creating a form and input boxes that each take in a variable/state and theonchangeevent is used when the value changes.
Create another file called addNote.css and add the following code to style the page:
.container {
    margin-top: 15%;
    margin: auto;
    width: 30%;
    padding: 50px;
    background-color: white;
    padding-inline-start: 30px;
}

.title {
    font-size: 20px;
    text-align: center;
    color: white;
}

.little-title {
    text-align: center;
    font-size: 20px;
}


input[type=text] {
    width: 100%;
    padding: 12px;
    margin: 1px 0 10px 0;
    border: 1px solid #c75bab;
    background: white;

}

textarea {
    width: 100%;
    padding: 10px;
    margin: 1px 0 10px 0;
    border: 1px solid #c75bab;
    background: white;

}

ul {
    padding-inline-start: 0px;
}

.button {
    color: white;
    text-align: center;
    font-size: 16px;
    cursor: pointer;
    width: 25%;
    padding: 8px;
    border: 1px solid #c75bab;
    border-radius: 10px;
    margin-top: 7%;
    background-color: #c75bab;
}
In the file called index.js in the queries folder, add the following code:
A query to get all notes
export const getNotesQuery = gql`
query {
  notes(order_by: { createdOn: desc }) {
    id
    name
  }
}
`;
Note:
- The
getNotesQueryis a function created to retrieve the data of the specified variables in the database using the graphqlquery.
A query to delete a note
export const deleteNoteMutation = gql`
mutation($id: Int!) {
  delete_notes (
      where: {id: {_eq: $id}}
  ){
     affected_rows
  }
}
`;
Note:
- the
deleteNoteMutationis a function created to remove the specified data(id) in the database using the graphqlmutation query
In the get-notes folder, create a file called getNotes.jsx and add the following code:
import React from "react";
import { Link } from "react-router-dom";
import { getNotesQuery } from "../../queries/index";
import { useQuery, useMutation } from "@apollo/client";
import { FaRegEdit, FaExternalLinkAlt } from "react-icons/fa";
import { MdDeleteForever } from "react-icons/md";
import { deleteNoteMutation } from "../../queries";
import toast from "toasted-notes";
import "toasted-notes/src/styles.css";
import "./getNotes.css";

export default function GetNotes(props) {
    const [deleteNote] = useMutation(deleteNoteMutation);
    const { error, loading, data }
        = useQuery(getNotesQuery)
    if (loading) {
        return <p className="load">Loading...</p>;
    }
    if (error) {
        return toast.notify("An error occured!");
    }

    const deleteNoteId = async (id) => {
        await deleteNote({
            variables: { id }
        });
        props.history.push("/notes");
        window.location.reload();
    }

    return (
        <div >
            <p className="title">All notes.</p>
            {data.notes.map((item) =>
                <div key={item.id} className="list-head">
                    <ul className="list-items">
                        <Link className="item-link"
                            to={{
                                pathname:
                                    `/notes/${item.id}`
                            }} ><FaExternalLinkAlt className="external-link" />
                        </Link>
                        <li className="item-name">{item.name}</li>
                        <li>{item.description}</li>
                        <li className="item-tag">{item.tag}</li>
                        <li className="item-link">
                            <Link className="item-link"
                                to={{
                                    pathname:
                                        `/note/${item.id}`
                                }} >
                                <FaRegEdit />
                            </Link>
                            <MdDeleteForever className="item-link" onClick={(e) => { const r = window.confirm("Do you really want to delete this resource?"); if (r == true) deleteNoteId(item.id) }} />
                        </li>
                    </ul>
                </div>)}
        </div>
    );
}
Note:
- Some required libraries are imported.
- Declare the state for
deleteNoteassigned to thedeleteNoteMutation. - Required objects were de-structured from the
getNotesQueryquery. - A function
deleteNoteIdis created to handle the id from the variable gotten from thedeleteNotestate for deletion. - Finally, in order to render the results, a
returnfunction is declared by creating a list and the values rendered as mini cards.
Create another file called getNotes.css and add the following code to style the page:
.external-link {
    float: right;
}

a {
    color: #FFF;
}

a:hover {
    color: #000
}

.list-head {
    color: #d9d4d4;
    margin: 0 2.5%;
    float: left;
    width: 20%;
}

.list-items {
    text-align: center;
    border: 1px solid black;
    list-style: none;
    margin: 8px -16px;
    background-color: #3b3c40;
}


.item-name {
    font-size: 20px;
}

.item-tag {
    font-size: 12px;
    margin-top: 8%;
}

@media screen and (max-width: 900px) {
    .list-head {
        width: 40%;
        margin-left: 6%;
    }
}

@media screen and (max-width: 600px) {
    .list-head {
        width: 90%;
        margin-left: 5%;
    }
}
In the file called index.js in the queries folder, add the following code:
A query to get a single note
export const getSingleNoteQuery = gql`
query ($id: Int!){
  notes_by_pk(id: $id) {
    id
    name
    description
    tag
    createdOn
  }
}
`;
Note:
- The
getSingleNoteQueryis a function created to retrieve a specific data(id) of the specified variables in the database using the graphqlquery.
In the get-single-note folder, create a file called getSingleNote.jsx and add the following code:
import React from "react";
import { getSingleNoteQuery } from "../../queries/index";
import { useQuery } from "@apollo/client";
import "./getSingleNote.css";

export default function GetSingleNote(props) {

    const {
        match: {
            params: { id },
        },
    } = props;
    const { error, loading, data }
        = useQuery(getSingleNoteQuery, { variables: { id } })
    if (loading) {
        return <p>Loading...</p>;
    }
    if (error) {
        return <p>An Error Occured.</p>;
    }
    const { name, description, tag } = data.notes_by_pk;
    console.log(name)

    return (
        <div className="single-container">
            <p className="single-note-name">{name}</p>
            <hr />
            <p className="single-note-desc">{description}</p>
            <p className="single-note-tag"><span>{tag}</span></p>
        </div >
    );
}
Note:
- Some required libraries are imported.
- Required objects were de-structured from the
getSingleNoteQueryquery. - Finally, in order to render the results, a
returnfunction is declared by rendering the values gotten from the data object.
Create another file called getSingleNote.css and add the following code to style the page:
.single-container {
    margin-top: 15%;
    margin: auto;
    width: 30%;
    padding: 50px;
    border: 1px solid beige;
    color: white;
    padding-inline-start: 30px;
}

.single-note-name {
    font-size: 30px;
    text-align: center;
}

.single-note-desc {
    font-size: 15px;
    text-align: center;
}

.single-note-tag {
    margin-top: 12%;
    font-size: 16px;
}

.single-note-tag span {
    background-color: purple;
}

@media screen and (max-width: 800px) {
    .single-container {
        display: inline-block;
        width: 78%;
        margin: 0 auto;
    }
}
In the file called index.js in the queries folder, add the following code:
A query to update a note
export const updateNoteMutation = gql`
  mutation ($name: String!, $description: String!, $tag: String!, $id: Int!) {
    update_notes(where: {id: {_eq: $id}}, _set: {name: $name, description: $description, tag: $tag}) {
      affected_rows
    }
  }
`;
Note:
- The
updateNoteMutationis a function created to modify the data in the database using the graphqlmutation queryand the prefixupdatefor the tablenotes.
In the update-note folder, create a file called updateNote.jsx and add the following code:
import React, { useState } from "react";
import { updateNoteMutation } from "../../queries";
import { useMutation } from "@apollo/client";
import toast from "toasted-notes";
import "toasted-notes/src/styles.css";

export default function UpdateNote(props) {
    const [loading, setLoading] = useState("");
    const [name, setName] = useState("");
    const [description, setDescription] = useState("");
    const [tag, setTag] = useState("");
    const [updateNote] = useMutation(updateNoteMutation);

    const {
        match: {
            params: { id },
        },
    } = props;


    const handleSubmit = async (event) => {
        try {
            event.preventDefault();
            setLoading(true);
            await updateNote({
                variables: { id, name, description, tag }
            });
            props.history.push("/notes");
            if (true) toast.notify("Successful")
            window.location.reload();
        } catch (error) {
            setLoading(false);
            if (error) toast.notify("Something went wrong. Please try again later.");
        }
    }

    if (loading) {
        return <p className="load">Loading...</p>
    }

    return (
        <>
            <p className="title">Update your note.</p>
            <div className="container">
                <form onSubmit={handleSubmit} align="center">
                    <input
                        type="text"
                        value={name}
                        placeholder="Name"
                        onChange={e => setName(e.target.value)}
                        required
                    />
                    <textarea
                        type="text"
                        value={description}
                        placeholder="Description"
                        onChange={e => setDescription(e.target.value)}
                        required
                    />
                    <input
                        type="text"
                        value={tag}
                        placeholder="Tag"
                        onChange={e => setTag(e.target.value)}
                        required
                    />
                    <br />
                    <input type="submit" value="update" className="button" />
                </form>
            </div>
        </>
    );
};
Note:
- Declare all the required states.
- A function called
handleSubmitis created to destructure objects(variables) from theupdateNotestate, remember that theupdateNotestate was already assigned to the imported functionupdateNoteMutation. This function helps to modify the exsiting data. - Finally in order to render the results, a
returnfunction is declared by creating a form and input boxes that each take in a variable/state and theonchangeevent is used when the value changes.
Add this to index.css to style the overall pages:
@import url('https://fonts.googleapis.com/css2?family=Quicksand&display=swap');

body {
  font-family: 'Quicksand', sans-serif;
  background-color: #0f1012;
}

.load {
  margin-top: 20%;
  text-align: center;
  font-size: 25px;
  color: white;
}

input[type=text] {
  width: 100%;
  padding: 12px;
  margin: 1px 0 10px 0;
  border: 1px solid #3b3c40;
  background: white;

}

textarea {
  width: 100%;
  padding: 10px;
  margin: 1px 0 10px 0;
  border: 1px solid #3b3c40;
  background: white;

}
Step 5:
Finally, let us create the routes in the App.js file and add the following code:
import React from "react";
import {
  ApolloProvider,
  ApolloClient,
  InMemoryCache,
} from "@apollo/client";
import { BrowserRouter as Router, Switch, Route } from 'react-router-dom';
import AddNote from "./components/add-notes/addNote";
import GetNotes from "./components/get-notes/getNotes.jsx";
import GetSingleNote from "./components/get-single-note/getSingleNote";
import UpdateNote from "./components/update-note/updateNote";

const client = new ApolloClient({
  cache: new InMemoryCache(),
  uri: "https://casual-egret-35.hasura.app/v1/graphql",
});

function App() {
  return (
    <Router>
      <Switch>
        <ApolloProvider client={client}>
          <Route exact path="/" component={AddNote} />
          <Route exact path="/notes" component={GetNotes} />
          <Route exact path="/notes/:id" component={GetSingleNote} />
          <Route exact path="/note/:id" component={UpdateNote} />
        </ApolloProvider>
      </Switch>
    </Router>
  );
}

export default App;
Note:
- The functions are imported and passed in as an object in different routes.
The ApolloProviderwraps up all the routes.
Run npm start to start the server and the routes should be able to function in your browser.
| Routes | Description |
| localhost:3000 | A form to add a note |
| localhost:3000/notes | All notes ever created |
| localhost:3000/notes/:id | A single note |
| localhost:3000/note/:id | A form to update a note |
There is no route for the delete option but it(delete) acts as a button function on the get all notes route.
That marks the end of this tutorial. I hope you find it worthwhile! :heart:
Here is the repo: https://github.com/codeliezel/hasura-todo-app


